Direct link for mobile devices.
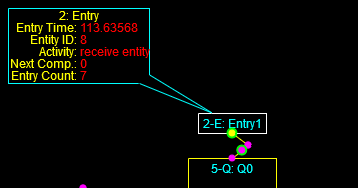
Today I updated the code to define DisplayGroups for all non-Path components, which means the internal data for each component will become visible when the relevant component is clicked. Moreover, each visible DisplayGroup object can be dragged to a new location. These operations work for both mouse and touch operations. Try it out and see what you think.
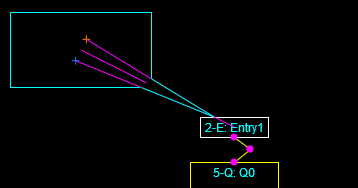
I’m still highly annoyed that the intersection test doesn’t always generate the proper result, which causes the pointer not to be displayed, but the effect is otherwise pretty smooth.
I cleaned up some code that caused the frame colors for the DisplayGroups to not be consistent (mostly by commenting out some old stuff) and shortened up the definition function for DisplayGroups to use default colors that can be customized separately.
Here’s the code for handling events, made consistent for mouse and touch ops.
|
1 2 3 4 5 6 7 8 9 10 11 12 13 14 15 16 17 18 19 20 21 22 23 24 25 26 27 28 29 30 31 32 33 34 35 36 37 38 39 40 41 42 43 44 45 46 47 48 49 50 51 52 53 54 55 56 57 58 59 60 61 62 63 64 65 66 67 68 69 70 71 72 73 74 75 76 77 78 79 80 81 82 83 84 85 86 87 88 89 90 91 92 93 94 95 96 97 98 99 100 101 102 103 104 105 106 107 108 109 110 111 112 113 114 115 116 117 118 119 120 121 122 123 124 125 126 127 128 129 130 131 132 133 134 135 136 137 138 139 140 141 142 143 144 145 146 147 148 149 150 151 152 153 154 155 156 157 158 159 160 161 162 163 164 165 166 167 168 169 170 171 172 173 174 175 176 177 178 179 180 181 182 183 184 185 186 187 188 189 190 191 192 193 194 195 196 197 198 199 200 201 202 203 204 205 206 207 208 209 210 211 212 213 214 215 216 217 218 219 220 221 222 223 224 225 226 227 228 229 230 231 232 233 234 235 236 237 238 239 240 241 242 243 244 245 246 247 248 249 250 251 252 253 254 255 256 257 258 259 |
var selectedDataGroup; function selectDisplayGroup(x, y) { var i = 0; if (setOfComponents.length > 0) { var done = false; while (!done) { if ((typeof setOfComponents[i].dataGroup !== "undefined") && (setOfComponents[i].dataGroup.isVisible()) && (setOfComponents[i].dataGroup.isClickInside(x, y))) { done = true; } else { i++; } if (i >= setOfComponents.length) { done = true; } } if (i < setOfComponents.length) { return i; } else { return -1; } } else { return -1; } } function selectComponent(x, y) { var i = 0; if (setOfComponents.length > 0) { var done = false; while (!done) { if ((typeof setOfComponents[i].graphic !== "undefined") && (setOfComponents[i].graphic.isClickInside(x, y))) { done = true; } else { i++; } if (i >= setOfComponents.length) { done = true; } } if (i < setOfComponents.length) { if (!setOfComponents[i].graphic.highlighted) { setOfComponents[i].graphic.highlight(); if (typeof setOfComponents[i].dataGroup !== "undefined") { setOfComponents[i].dataGroup.turnOn(); } drawModel(); } else { setOfComponents[i].graphic.unHighlight(); if (typeof setOfComponents[i].dataGroup !== "undefined") { setOfComponents[i].dataGroup.turnOff(); } drawModel(); } return i; } else { return -1; } } else { return -1; } } ///////////////////mouse drag events var componentSelectionIndex; var dragFlag = false; var startDragX; var startDragY; var dragBaseX; var dragBaseY; var dragLastX; var dragLastY; var totalDragDistance; var mouseTimeStamp = 0; var displayGroupPointer = -1; //start drag canvas.addEventListener("mousedown", function(event) { startDrag(event); }); function startDrag(e) { mouseTimeStamp = Date.now(); startDragX = globalBaseX; startDragY = globalBaseY; dragBaseX = e.clientX; dragBaseY = e.clientY; dragLastX = dragBaseX; dragLastY = dragBaseY; dragFlag = true; totalDragDistance = 0; var temp = selectDisplayGroup(dragLastX+globalBaseX, dragLastY+globalBaseY); if (temp > -1) { displayGroupPointer = temp; } } //end drag canvas.addEventListener("mouseup", function(event) { endDrag(event); }); function endDrag(e) { var endTime = Date.now(); if (((endTime - mouseTimeStamp) < 300) && (totalDragDistance <= 3)) { //treat as a click event componentSelectionIndex = selectComponent(dragLastX+globalBaseX, dragLastY+globalBaseY); } dragFlag = false; displayGroupPointer = -1; } //move while dragging canvas.addEventListener("mousemove", function(event) { doDrag(event); }); function doDrag(e) { if (dragFlag) { var currentX = e.clientX; var currentY = e.clientY; var incrementX = currentX - dragLastX; var incrementY = currentY - dragLastY; totalDragDistance += Math.abs(incrementX) + Math.abs(incrementX); if (totalDragDistance > 3) { if (displayGroupPointer > -1) { setOfComponents[displayGroupPointer].dataGroup.moveBy(incrementX, incrementY); drawModel(); } else { if (incrementX > 0) { panLeft(incrementX) } else if (incrementX < 0) { panRight(-incrementX) } if (incrementY > 0) { panUp(incrementY); } else if (incrementY < 0) { panDown(-incrementY); } } dragLastX = currentX; dragLastY = currentY; } } } //mouse leaves canvas canvas.addEventListener("mouseleave", function(event) { leaveDrag(event); }); function leaveDrag(e) { if (dragFlag) { globalBaseX = startDragX; globalBaseY = startDragY; if (!running) { drawModel(); } dragFlag = false; } } ///////////////////touch drag events, for now only supports first touch point var touchTimeStamp = 0; //start drag canvas.addEventListener("touchstart", function(event) { startDragT(event); }); function startDragT(e) { touchTimeStamp = Date.now(); startDragX = globalBaseX; startDragY = globalBaseY; e.preventDefault(); var touches = e.changedTouches; dragBaseX = touches[0].pageX; //change to clientX dragBaseY = touches[0].pageY; //change to clientY dragLastX = dragBaseX; dragLastY = dragBaseY; dragFlag = true; totalDragDistance = 0; var temp = selectDisplayGroup(dragLastX+globalBaseX, dragLastY+globalBaseY); if (temp > -1) { displayGroupPointer = temp; } } //end drag canvas.addEventListener("touchend", function(event) { endDragT(event); }); function endDragT(e) { var endTime = Date.now(); if (((endTime - touchTimeStamp) < 300) && (totalDragDistance <= 3)) { //treat as a click event componentSelectionIndex = selectComponent(dragLastX+globalBaseX, dragLastY+globalBaseY); } dragFlag = false; displayGroupPointer = -1; } //move while dragging canvas.addEventListener("touchmove", function(event) { doDragT(event); }); function doDragT(e) { if (dragFlag) { //e.preventDefault(); var touches = e.changedTouches; var currentX = touches[0].pageX; var currentY = touches[0].pageY; var incrementX = currentX - dragLastX; var incrementY = currentY - dragLastY; //accumulate drag distance totalDragDistance += Math.abs(incrementX) + Math.abs(incrementX); if (totalDragDistance > 3) { if (displayGroupPointer > -1) { setOfComponents[displayGroupPointer].dataGroup.moveBy(incrementX, incrementY); drawModel(); } else { if (incrementX > 0) { panLeft(incrementX) } else if (incrementX < 0) { panRight(-incrementX) } if (incrementY > 0) { panUp(incrementY); } else if (incrementY < 0) { panDown(-incrementY); } } dragLastX = currentX; dragLastY = currentY; } } } //touch leaves appropriate area (control works beyond canvas) canvas.addEventListener("touchcancel", function(event) { leaveDragT(event); }); function leaveDragT(e) { if (dragFlag) { globalBaseX = startDragX; globalBaseY = startDragY; if (!running) { drawModel(); } dragFlag = false; } } |